
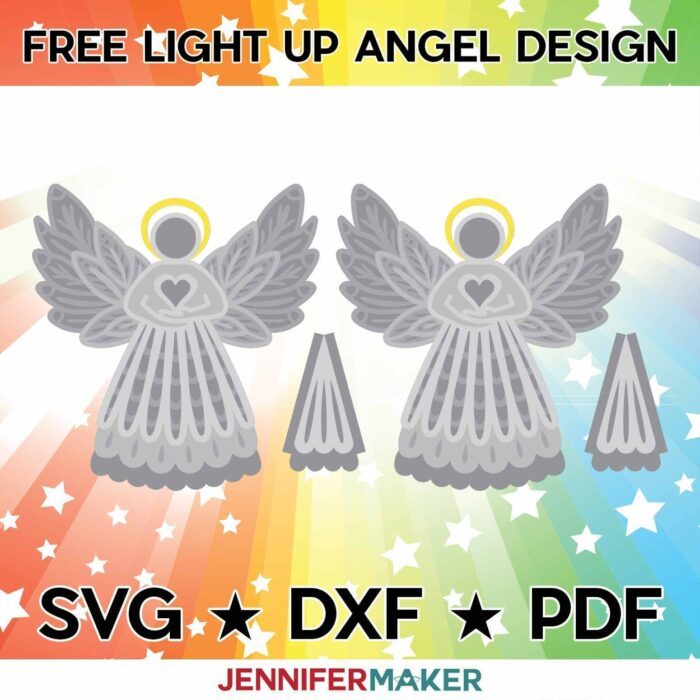
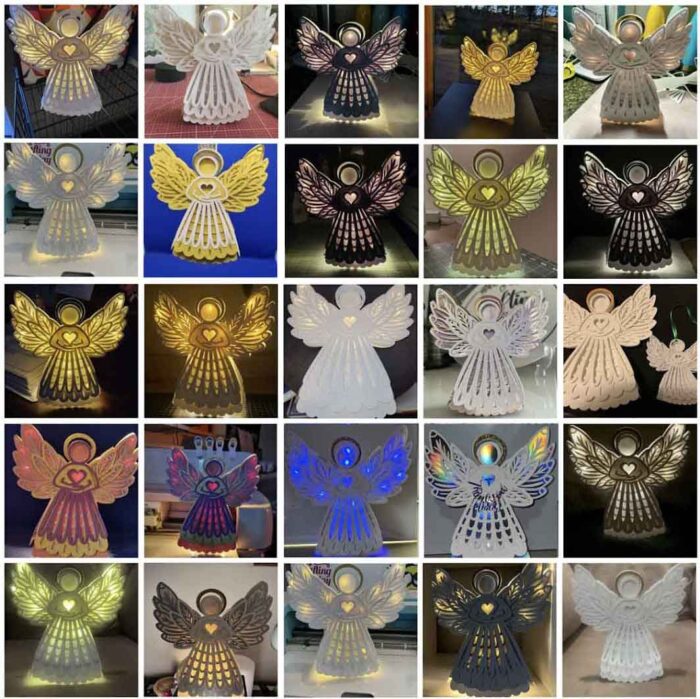
Learn how to make a beautiful light up angel out of cardstock that you can also use as a tree topper!
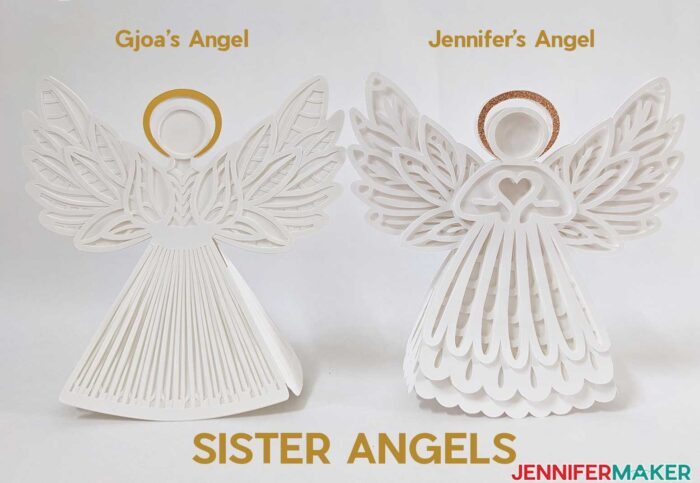
I’m excited to share a project that combines some of my favorite things: light up papercrafts and angels! I’ve always loved angels as decorations. There’s just something about them that make me feel very peaceful, and always remind me to take a calming breath. Some days, that’s a necessary reminder! This angel was inspired by my friend Gjoa’s paper angel that she debuted during our Holiday Maker Fest 2020 event — we made our angel in a similar style with Gjoa’s permission.
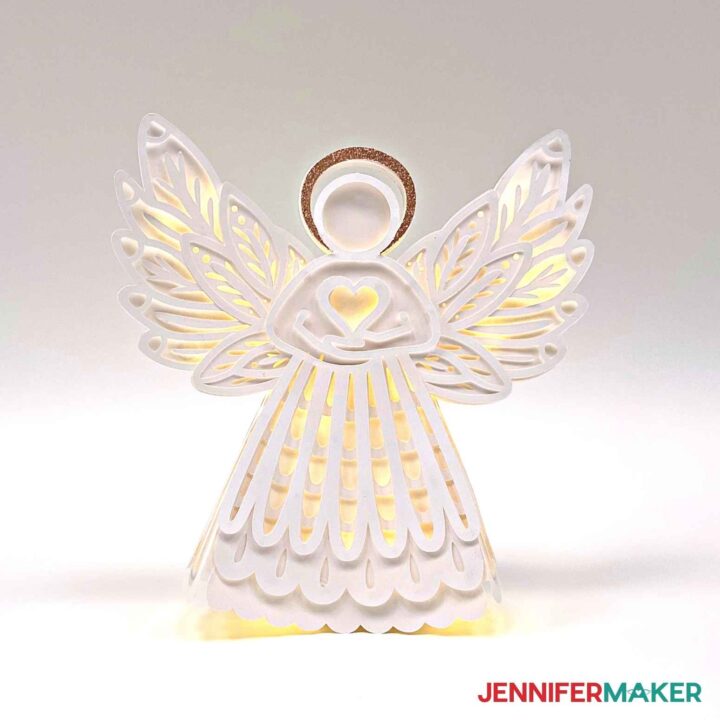
My light up angel uses simple materials that create an elegant result. It will make a beautiful tree topper, decor item, night light, or even a gift for a special person in your life!
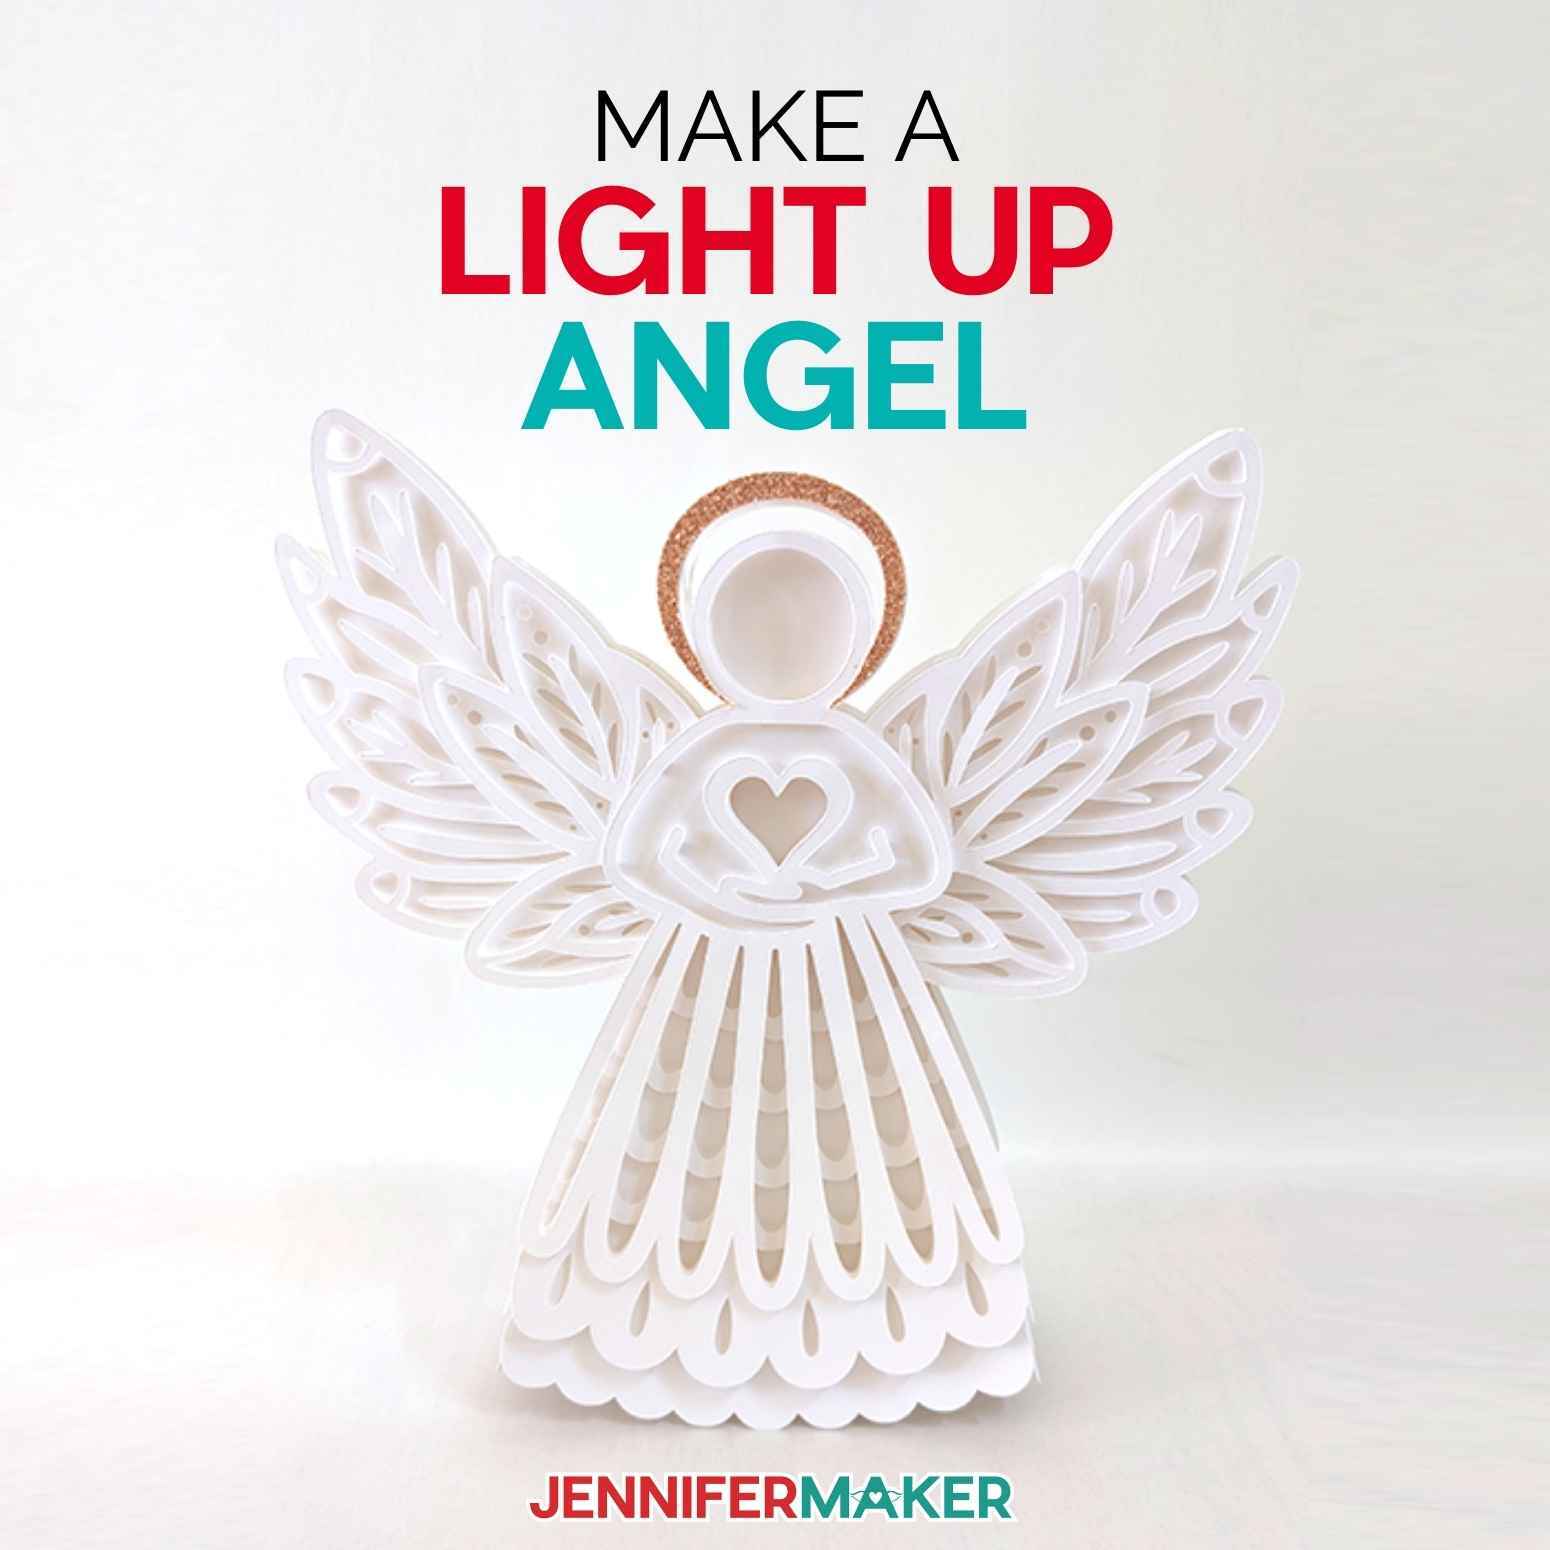
The key to this angel is lining up your layers perfectly to allow different amounts of light to shine through. My tutorial will show you how to line everything up just right AND how to attach your lights for a soft glow! This is truly a simple project that looks more complicated than it actually is.
The materials and supplies are super simple too! Good-quality cardstock is very important. For the angel’s main pieces, I used sixty-five pound cardstock in white. It’s sturdy, but lets the lights shine through nicely. For the halo, I used gold glitter cardstock, but you can use different colors to fit your decor. It would also look nice in silver, too! Some matching ribbon will come in handy when we look at display options, too. I did a lot of experimenting to find the best cut settings, so I’ll show you how to get heavenly results!
I used a few different kinds of adhesives to create the angel’s layered look. I’ll show you where to use each kind in the tutorial, including the best way to attach the pretty fairy lights! They’ll stay right where you want them and will be easy to use. You won’t want to miss my tips!
This project involves a lot of detailed cutting, but it’s so worth the time! Before you start, you might want to review my Tips for Cleaner Cuts to get the best results.
Here’s a supply list of what you need to make a 3D light up angel! This post contains some affiliate links for your convenience (which means if you make a purchase after clicking a link I will earn a small commission but it won’t cost you a penny more)! Read my full disclosure policy.
Materials to Make a 3D Light Up Angel Ornament or Tree Topper
View my Amazon shopping list with the exact items we used to make this project
- Seven (7) Sheets of 8.5″ x 11″ 65 lb White Cardstock
- One (1) Sheet of 8.5″ x 11″ Gold Glitter Cardstock
- One (1) Set of 3.3′ Long Fairy Lights
- Thin Ribbon — for hanging angel as an ornament
- Cricut Blue LightGrip Machine Mat 12″ x 12″
- Cricut Green StandardGrip Machine Mat 12″ x 12″
- Double-Sided Adhesive Foam Dots – Micro Pops
- 3D Zots Glue Dots
- Craft Glue
- Tweezers
- Spatula
- Scraper
- Brayer
- Weeding Tool
- A method to cut your material — I used the amazing Cricut Maker 3 but you can also use the Cricut Explore Series or even the Joy to make smaller paper angels
- Design #428 — My free SVG/PDF/DXF design files are in my free resource library (get the password by filling out the form at the bottom of this page)
How to Make Your Own 3D Light Up Paper Angel
Light Up Angel
Learn how to make a beautiful light up angel out of cardstock that you can also use as a tree topper!
Materials
- Seven (7) Sheets of 8.5" x 11" 65 lb White Cardstock
- One (1) Sheet of 8.5" x 11" Gold Glitter Cardstock
- One (1) Set of 3.3' Long Fairy Lights
- Thin Ribbon — for hanging angel as an ornament
- Design #428 (My free SVG/PDF/DXF design files are available in my free resource library - get the password by filling out the form at the bottom of this page)
Tools
- A method to cut your material — I used the amazing Cricut Maker 3 but you can also use the Cricut Explore Series or even the Joy to make smaller angels
- Cricut Blue LightGrip Machine Mat 12" x 12"
- Cricut Green StandardGrip Machine Mat 12" x 12"
- Double-Sided Adhesive Foam Dots - Micro Pops
- 3D Zots Glue Dots
- Craft Glue
- Tweezers
- Spatula
- Scraper
- Brayer
- Weeding Tool
Instructions
STEP 1: GET MY FREE LIGHT UP ANGEL DESIGN FILES
First, download my Light Up Angel SVG/DXF/PDF files from my free resource library. It's Design #428 Upload the SVG file to Cricut Design Space and add it to your Canvas.
TIP: If you are not sure how to upload an SVG cut file to Cricut Design Space, watch this helpful video training series I made. If you are on an iPad or iPhone, here is how to download and upload SVG files to the Cricut Design Space app.
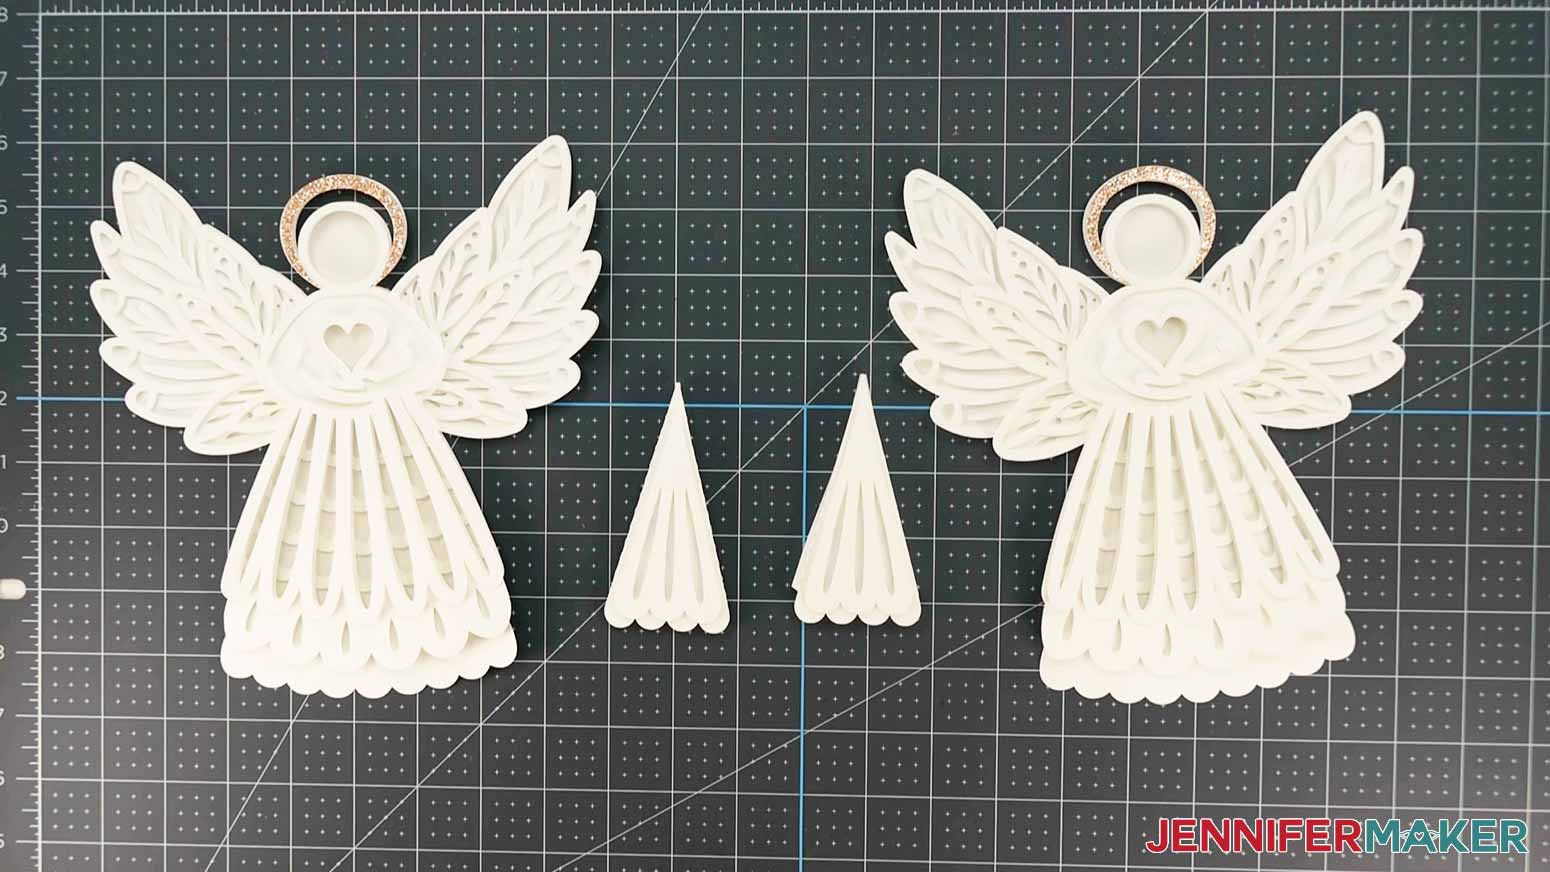
NOTE: I've also included a file size for the Joy. It makes a beautiful ornament or decoration for the front of a card. Just cut it out using your preferred papers (you might have to experiment with cut settings to get the best results since the design is intricate) and then assemble it as below!
STEP 2: PREPARE AND CUT YOUR LIGHT UP ANGEL DESIGN
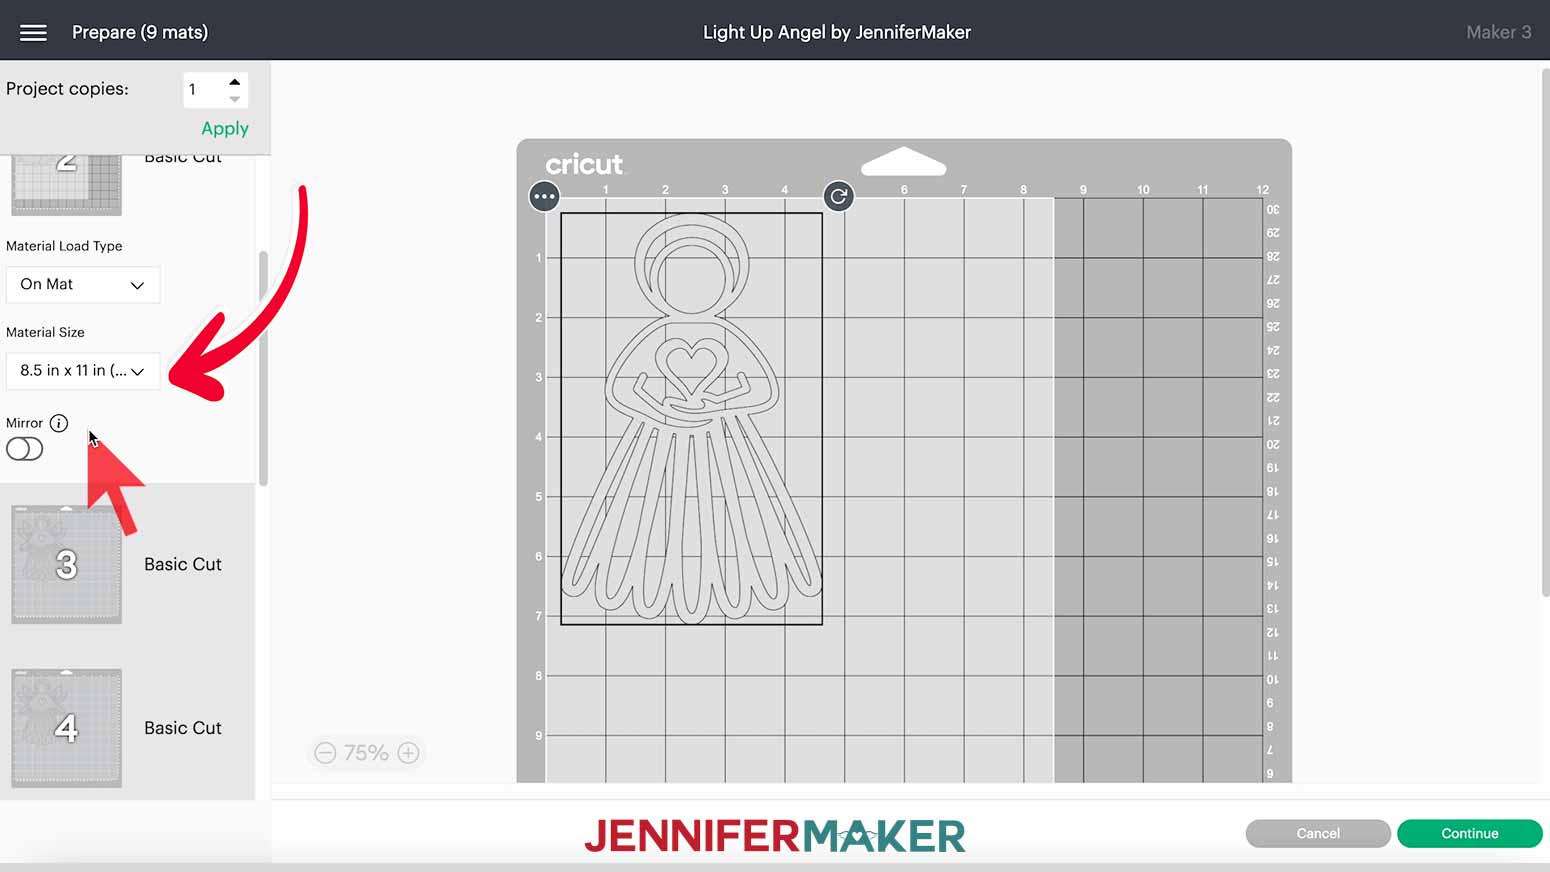
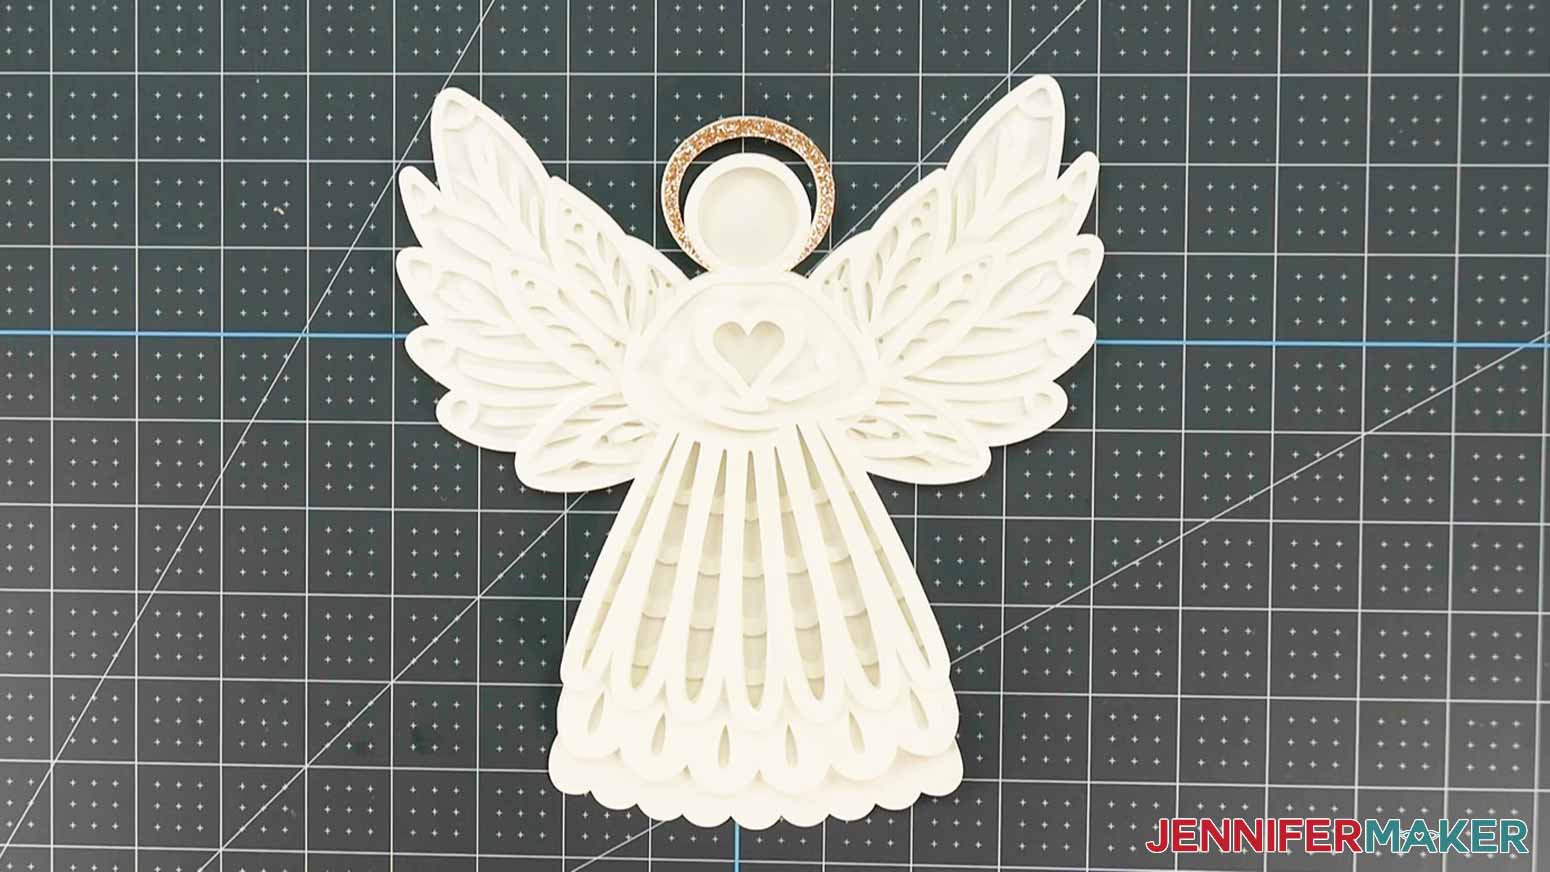
You can zoom out to see all of the design by clicking on the minus (-) sign on the lower left. This is what my Light Up Angel design looks like on my Canvas.
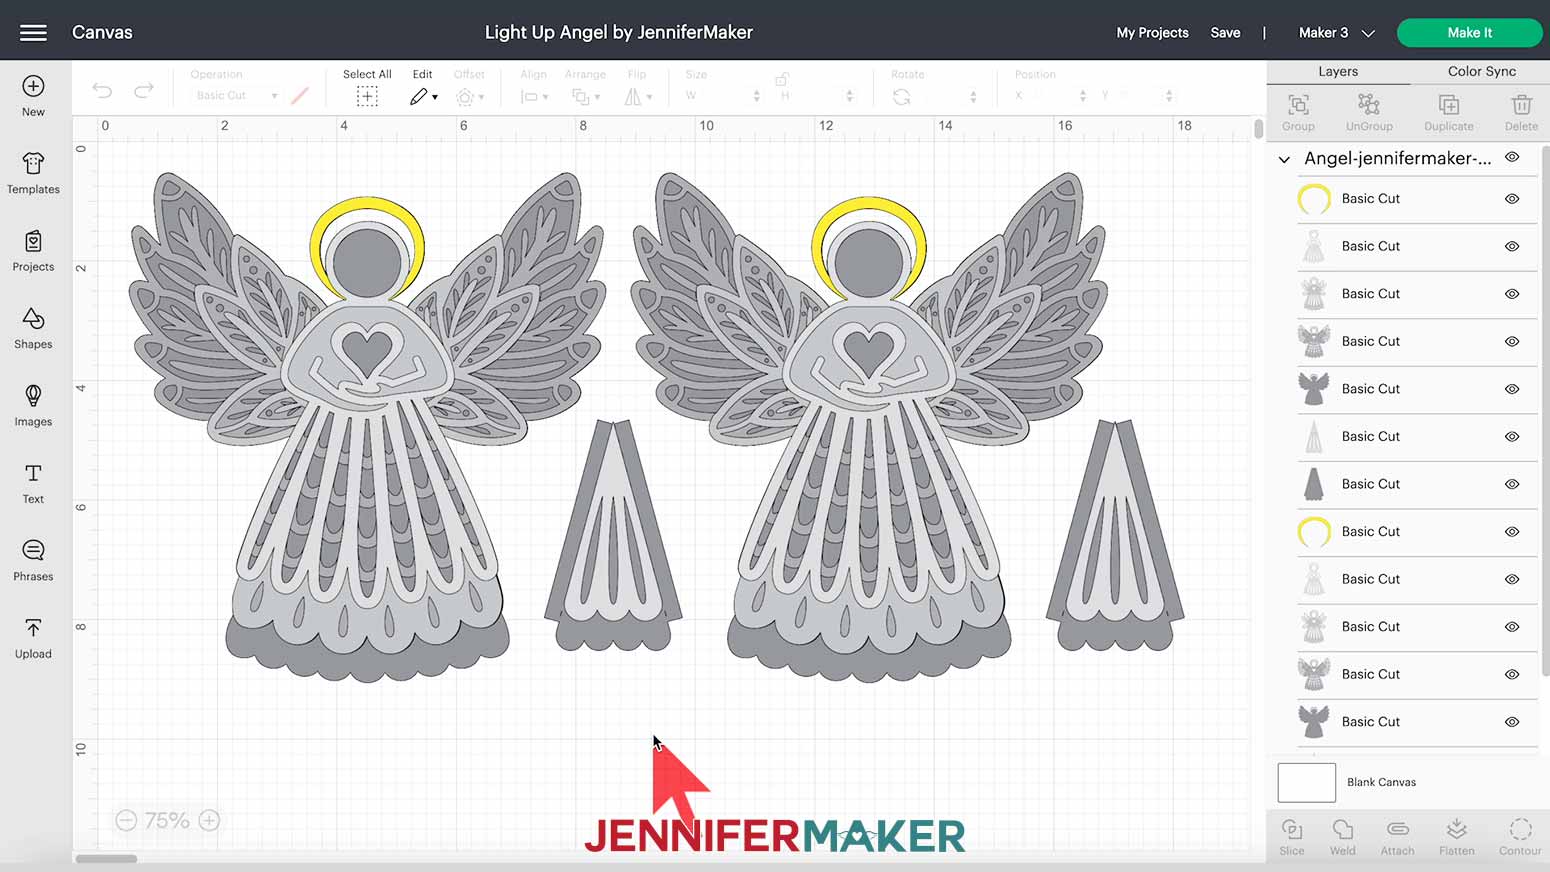
I've designed the angel to cut on 8.5" x 11" paper. The layers are in shades of gray for easy viewing.
The finished size of my angel is about 8" wide by 8.5" tall. If you would like to make a different sized angel, keep the lock icon closed and click and drag the resize icon on the bounding box, or type a new dimension into the width ("W") or height ("H") box at the top menu under "Size." Use larger paper if you're enlarging your design.
Make sure you have the right machine selected and click "Make It."
If prompted, click "On Mat," "12 in x 12 in," and "Continue."
Make sure the Material Size for all mats is 8.5" x 11". When you change the size of your first mat, it will change the size of any remaining mats that are the same color/shade of gray, so you won't have to edit every single mat.
This will give you ten mats. If you're using the same paper colors as I am, you can reduce the number of mats to eight by rearranging some objects. Just move the angel on Mat 2 to Mat 1. Make sure it doesn't overlap any of the objects already on the mat. You can also move the two small side pieces from Mat 7 to Mat 3.
TIP: For detailed instructions on combining mats, see my Paper Dahlia tutorial.
Then click "Continue" in the bottom right.
For the white cardstock mats, I used the "Cardstock (for intricate cuts)" setting. To find it, click "Browse All Materials" and type "Intricate" in the search bar. Then select the result, click Apply, and leave the Pressure at "Default." You can click "Remember Material Settings" since you'll be using the same settings for all the white mats.
Place your first mat's cardstock on a blue Cricut LightGrip Machine Mat. Use a brayer to adhere it well. Load your mat and press your machine's Go button. Once the mat is finished, unload it, flip it over on your workspace, and gently roll a corner back to release the cardstock. Complete the process for the rest of the white mats.
Once you get to the yellow mat, place your glitter cardstock on a green Cricut StandardGrip Machine Mat, change your paper setting to "Glitter Cardstock" and change the Pressure to "More." Cut the mat and remove the elements using the same process.
TIP: When removing the more intricate pieces from your mats, go slowly and use the spatula to gently lift them so they don’t tear.
STEP 3: ATTACH THE LAYERS FOR THE LIGHT UP ANGEL
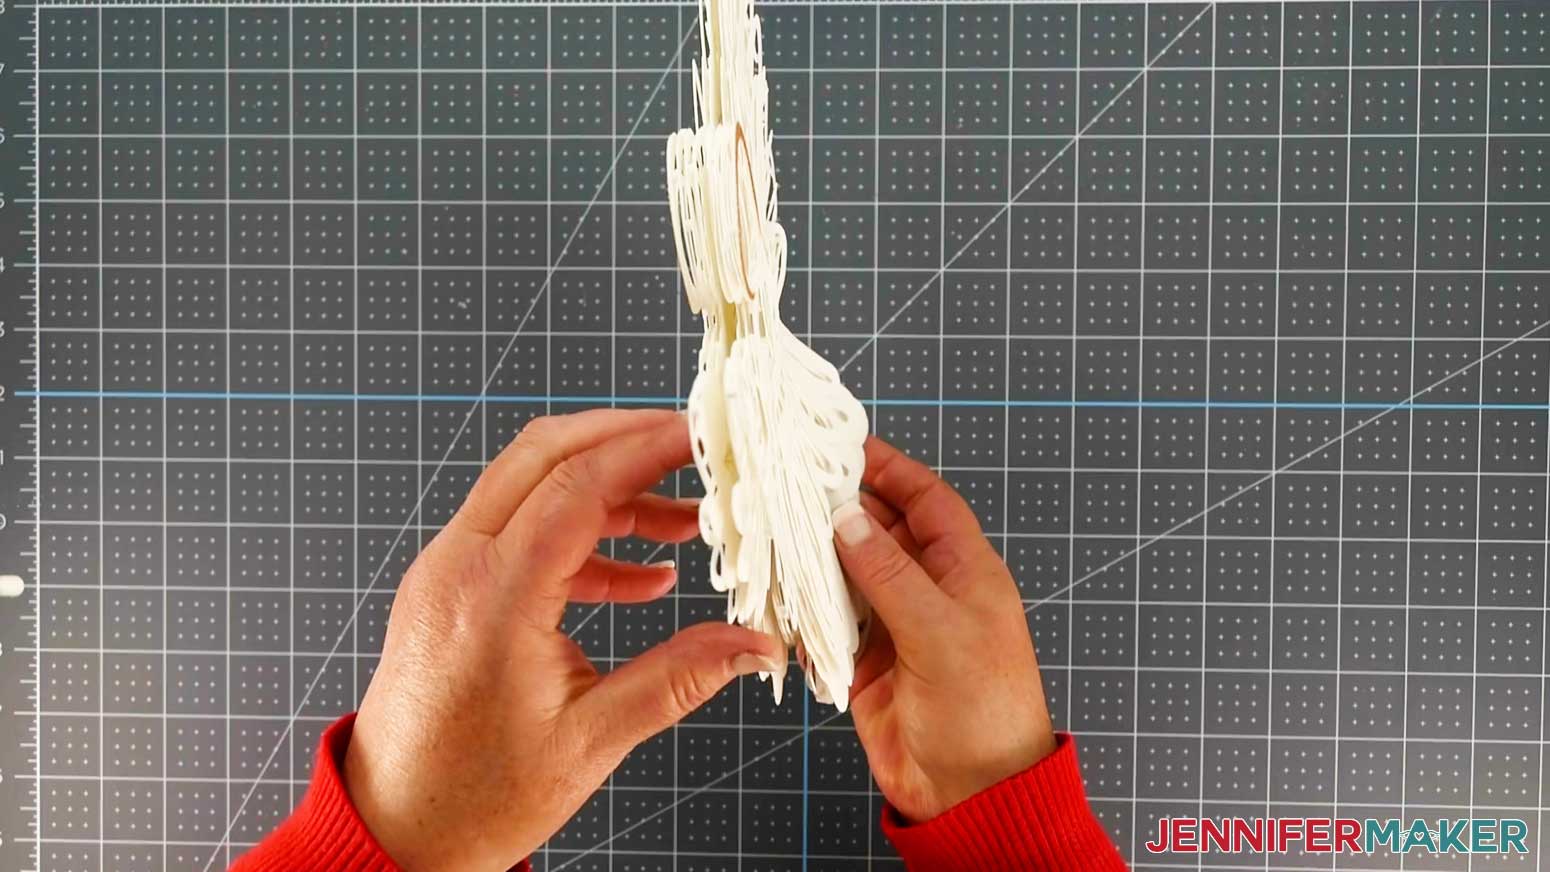
Separate your cut pieces so you have two stacks: One stack will make up the front of the angel and the other stack will make up the back. We'll call the top pieces of each stack Layer 1 and the bottom will be Layer 4. You'll also have four pieces for the skirt sides. Set the two gold halo pieces aside.
Start by assembling the first side of your angel using one stack of the large pieces. Find Layer 3 and flip it over. Use your tweezers to move micro pop dots from the backing paper to the layer's back. Spread them out evenly until it looks similar to mine.
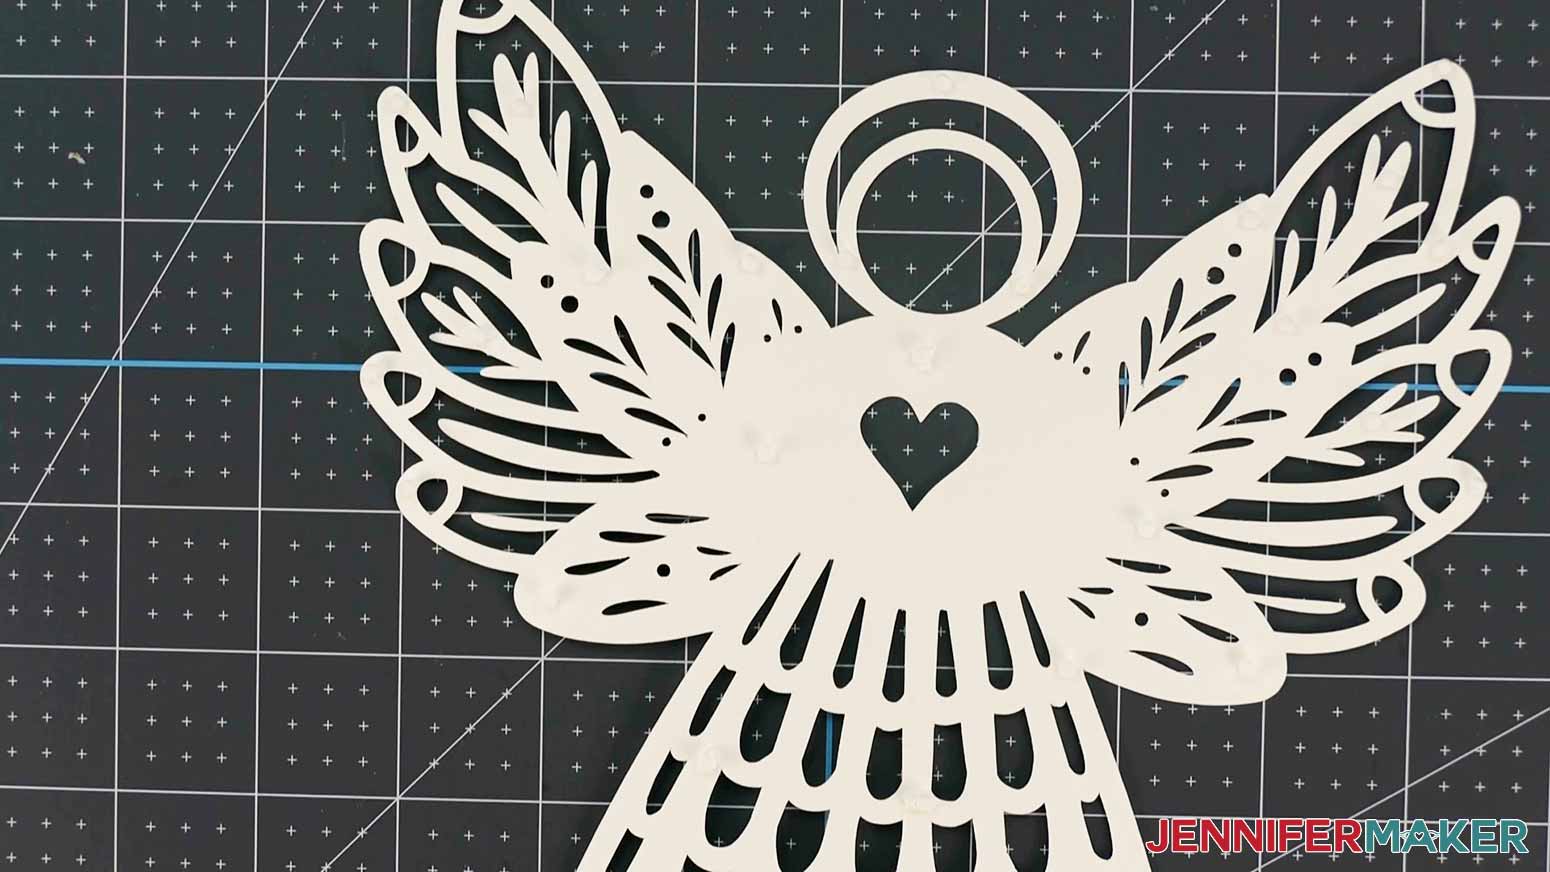
Remove the backing from each dot and then flip the layer over. Align the edges of the layer with the edges of Layer 4 before gently placing it on top. Make sure you're happy with the placement before pressing down. If not, pull the layer back up and move it. Press down to adhere all the dots to Layer 4.
Use the same steps to attach Layer 2 to Layer 3 and then Layer 1 on top.
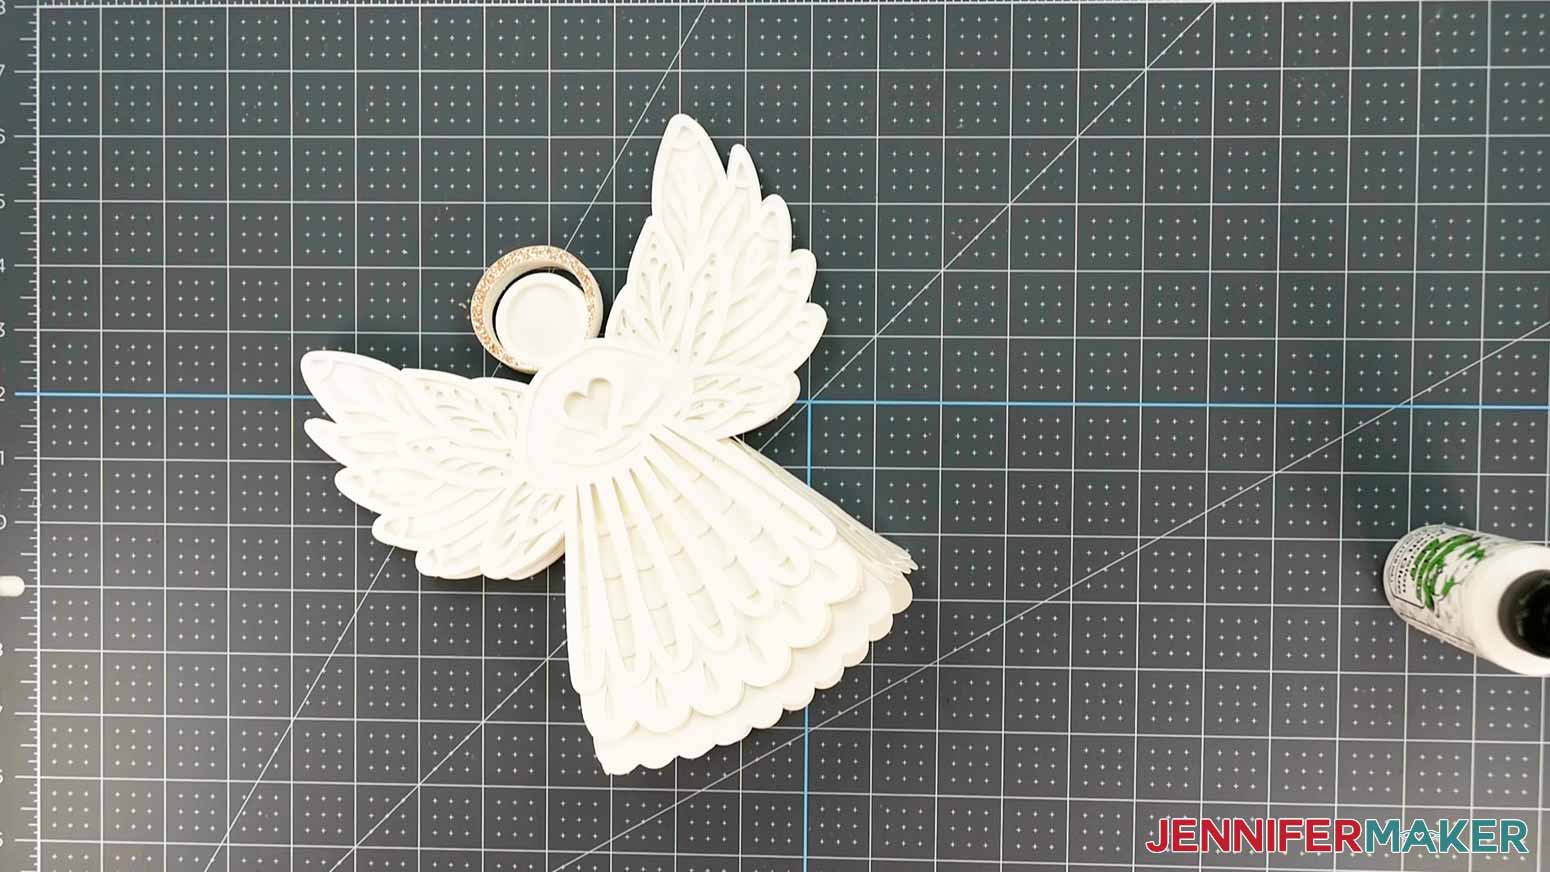
Then, glue one of the halos to the top of Layer 1 so that the glitter will be visible from the front. You're done with side one!
Assemble the second side using the same method as above. Don't forget the halo!
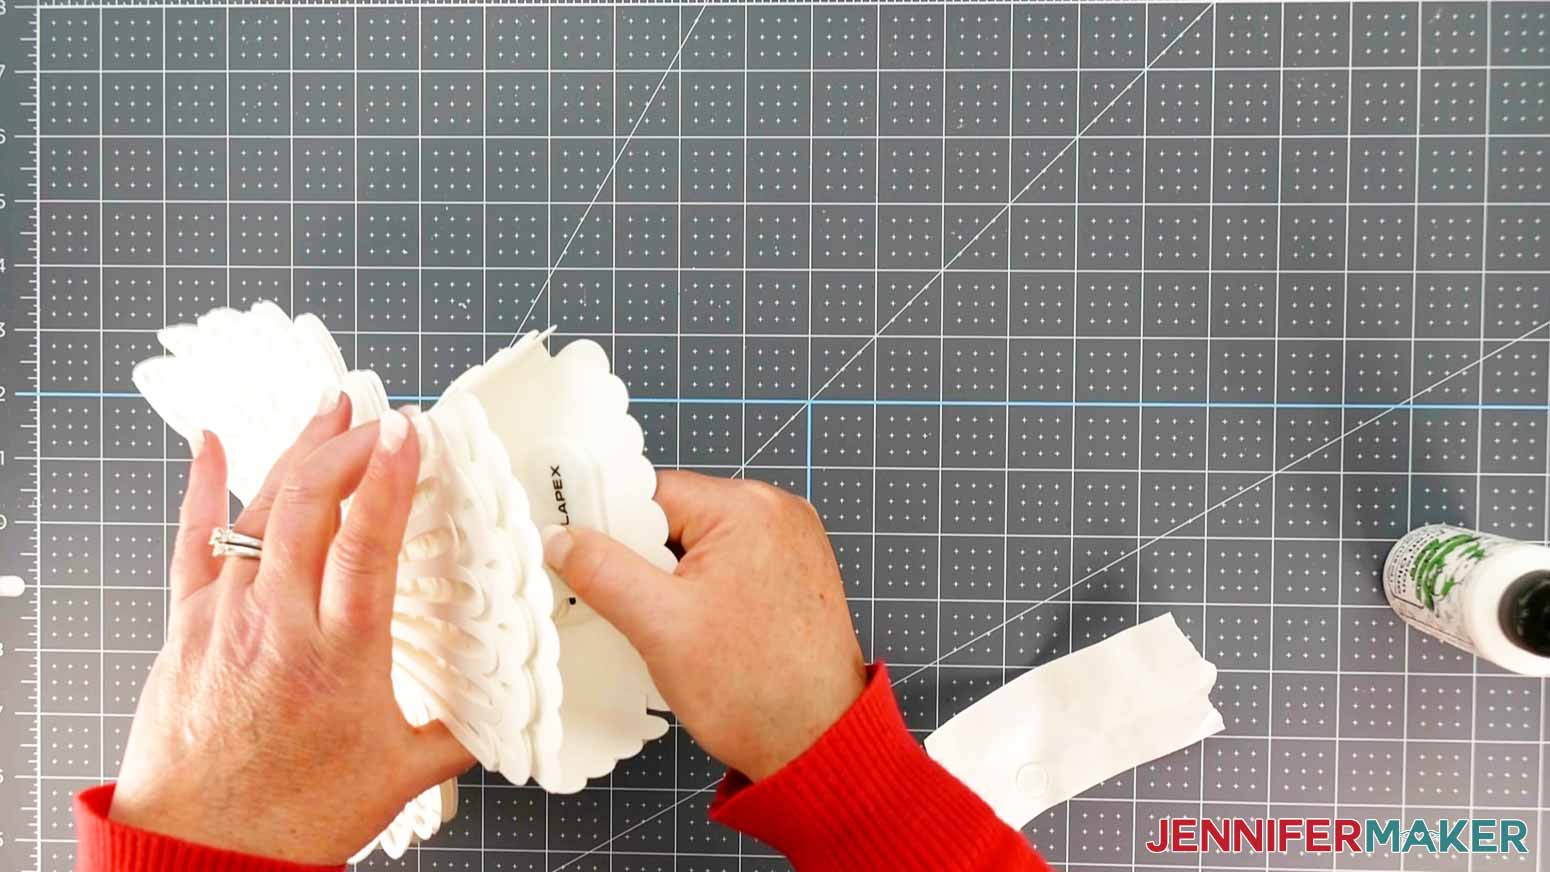
Attach the side piece layers using the same method. Place the dots on the back of the smaller pieces with cutouts. Then adhere them to the larger side tabbed pieces. Fold the tabs in, too.
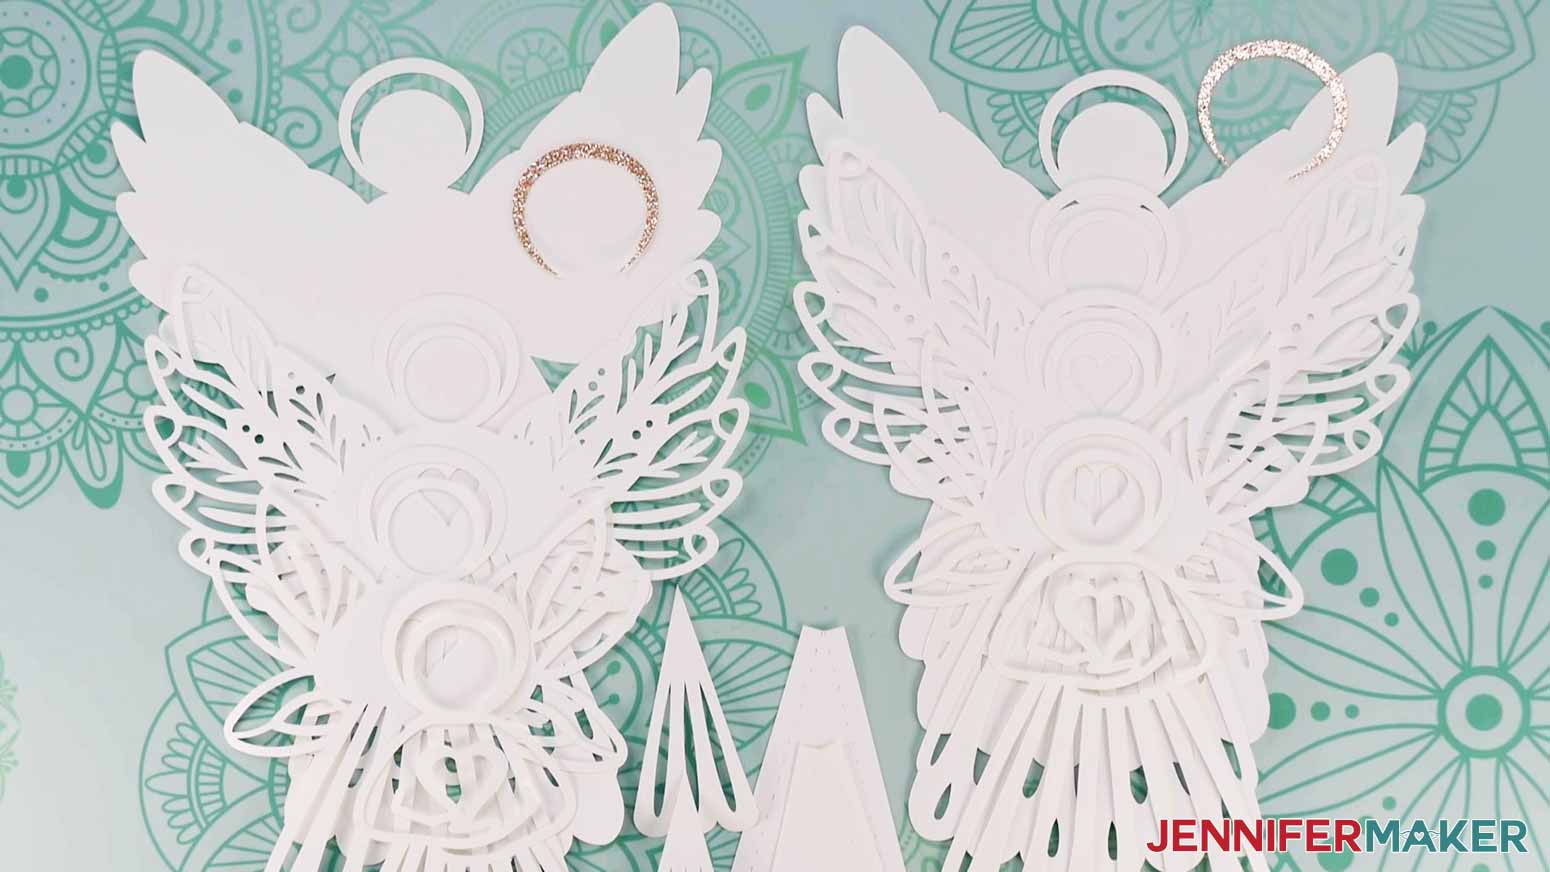
Here are all four sections assembled.
STEP 4: ATTACH THE FAIRY LIGHTS AND ASSEMBLE THE ANGEL
Now we can attach the fairy lights to one side using the 3D Zots which are glue dots. First, turn the fairy lights on to make sure they work.
Take one side of your angel and place it face down on a clean, protected work surface. Starting at the end of the lights without the battery pack, arrange a few of them so they're evenly spread over the wings and body. Leave the rest of the lights and the battery pack free for now.
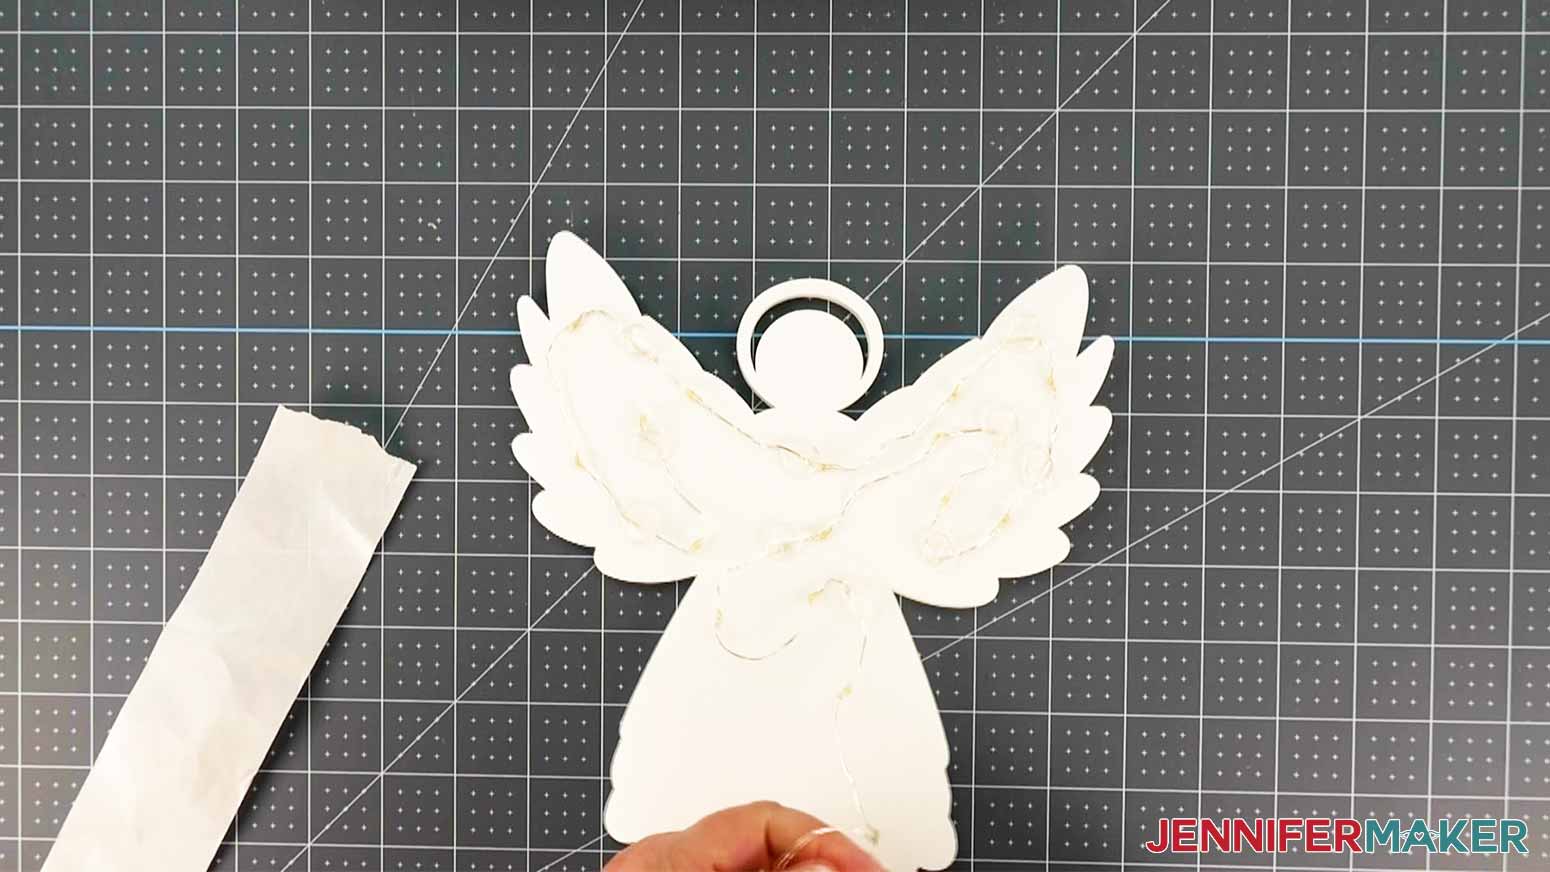
Place several Zots on top of the wire to adhere the lights to the cardstock, avoiding the skirt. We'll use the free side of the Zots to attach the angel's other side in a bit. Next, apply a Zot on the angel's head.
Here's what my attached fairy lights look like after placing the Zots.
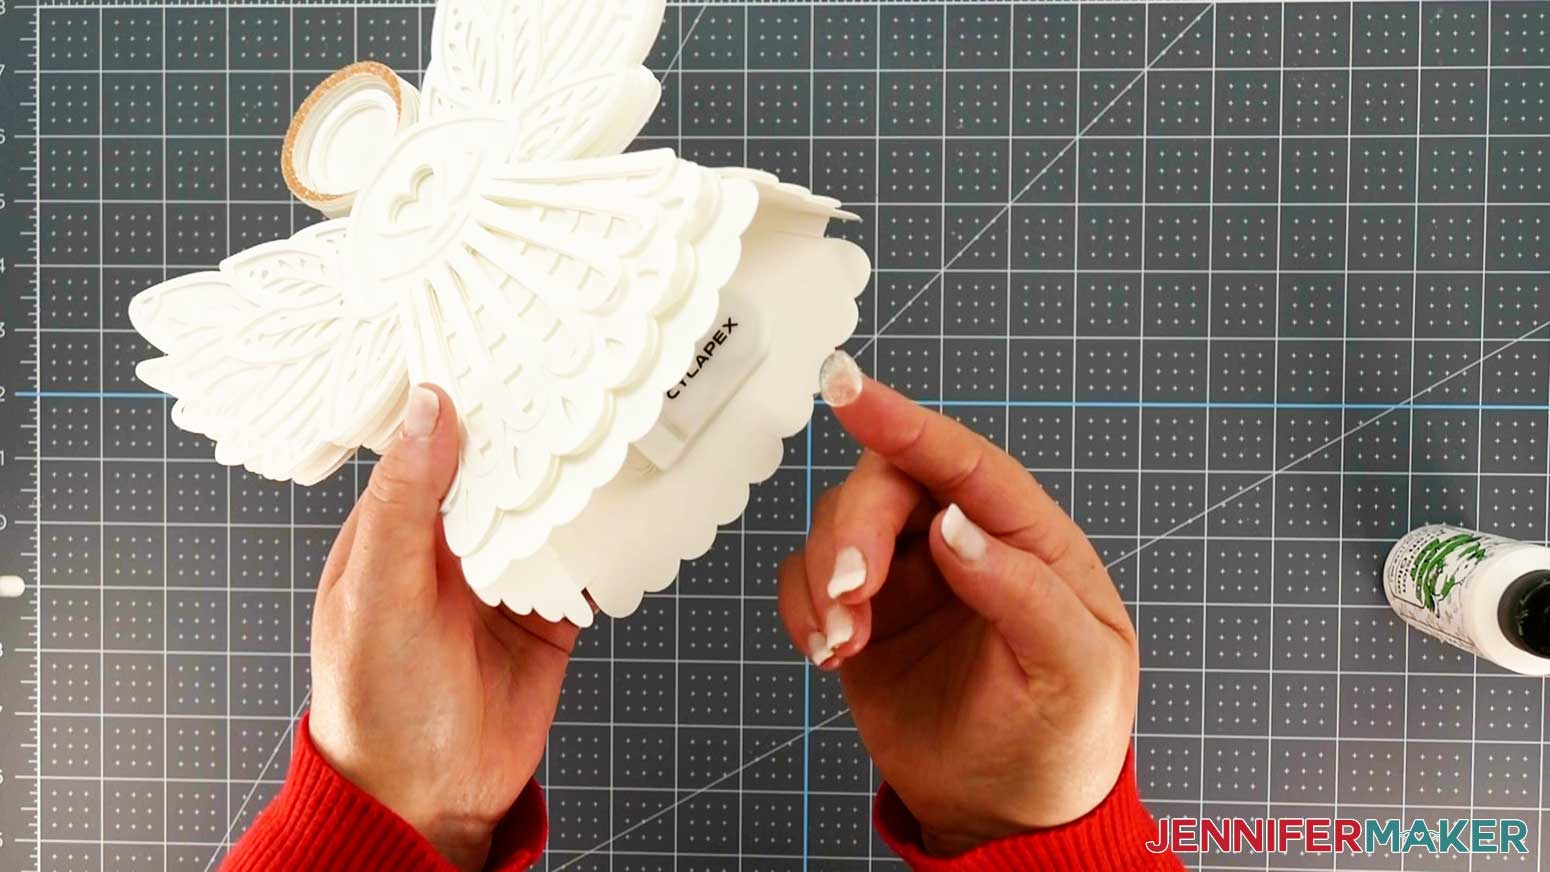
Now line up the other side so the angels are back to back. Make sure all the edges align before pressing down gently. The skirts will be unattached so we can create the 3D space with the side sections.
Next, find the skirt side sections. Put a line of glue along one tab and attach it to the inside edge of the angel's front, lining up the skirt lace at the bottom. Glue the other tab inside the angel's back.
Repeat this process for the other skirt side piece on the opposite side.
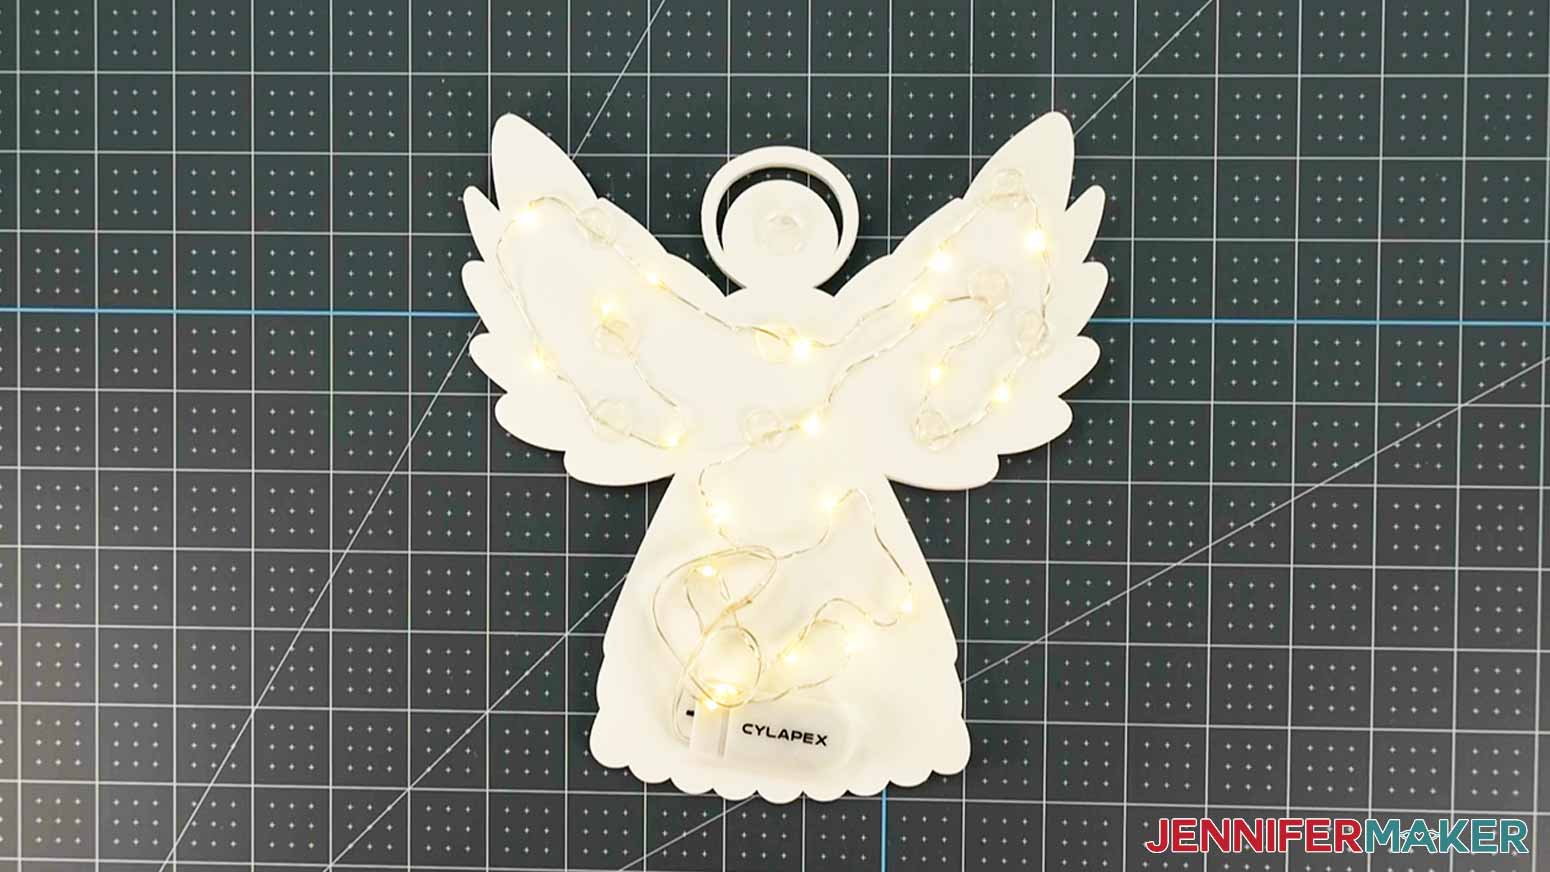
Next, use a Zot to adhere the battery pack to the bottom of the skirt. Make sure you’ll be able to reach the switch easily.
Finally, apply Zots inside the skirt to secure any loose fairy lights to the cardstock. Space the lights as evenly as you can and make sure the wire won’t interfere if you want to use the angel as a tree topper.
STEP 5: SHOW IT OFF
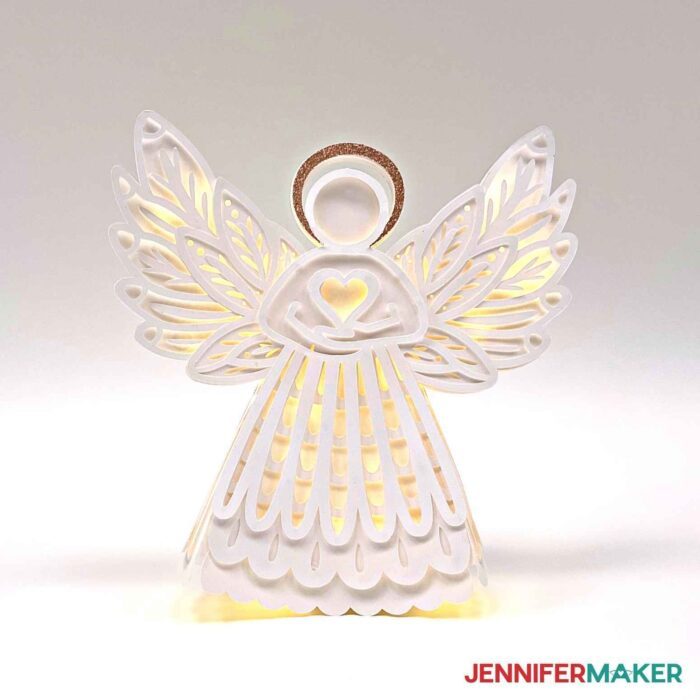
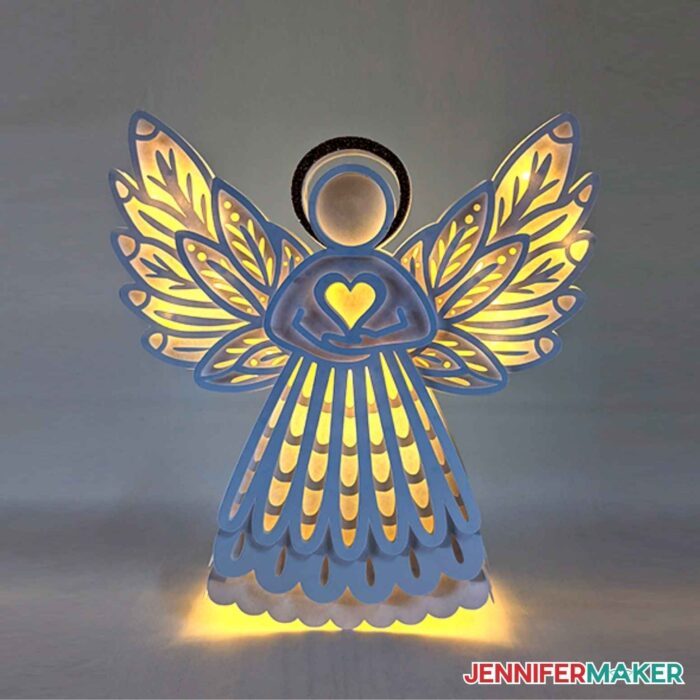
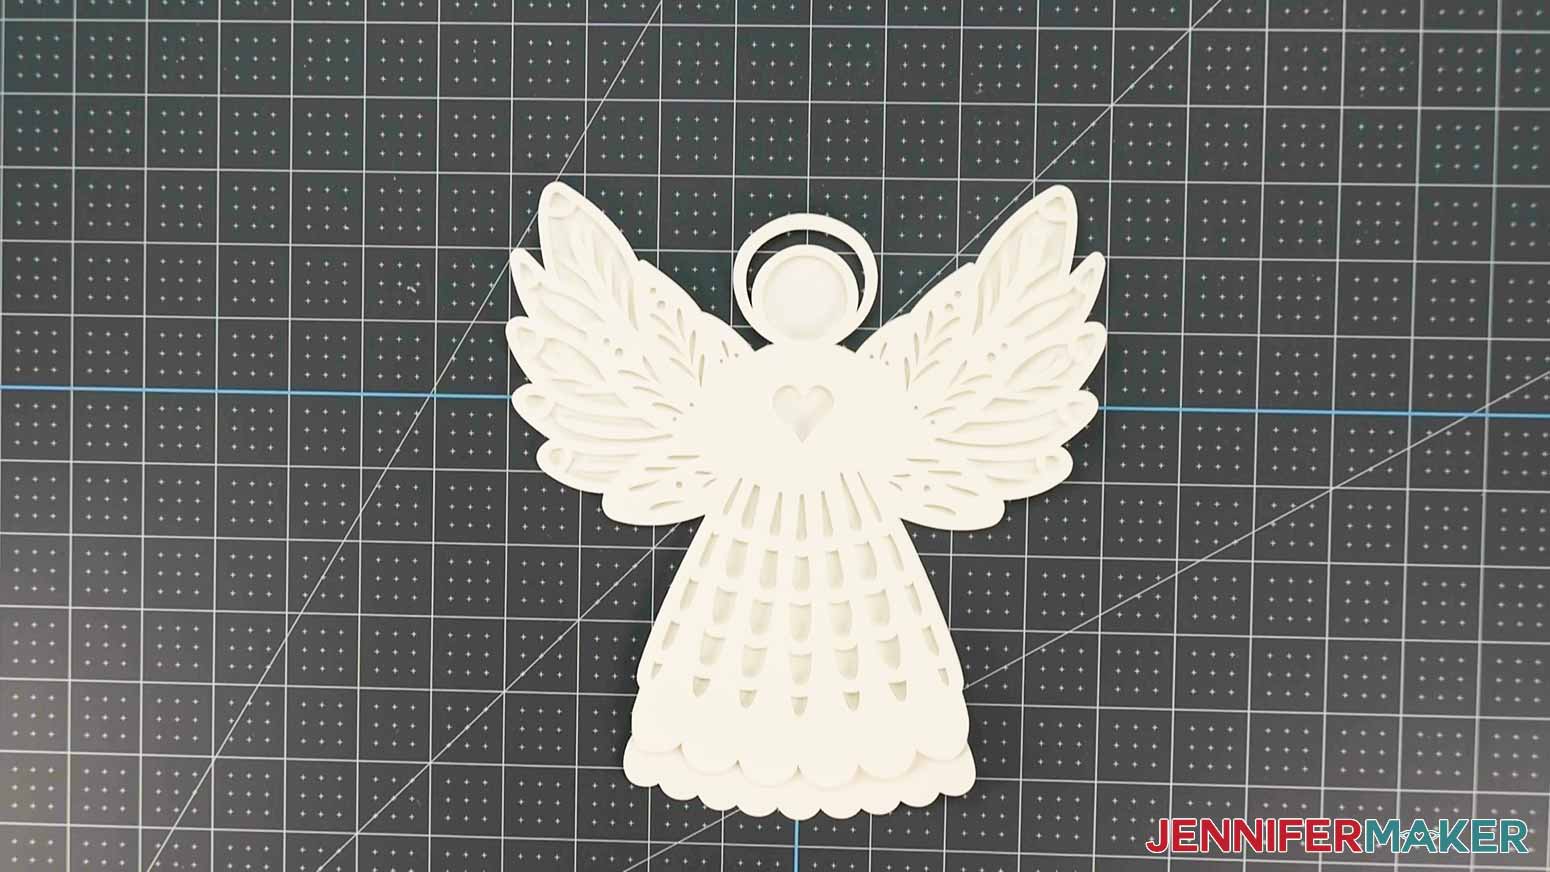
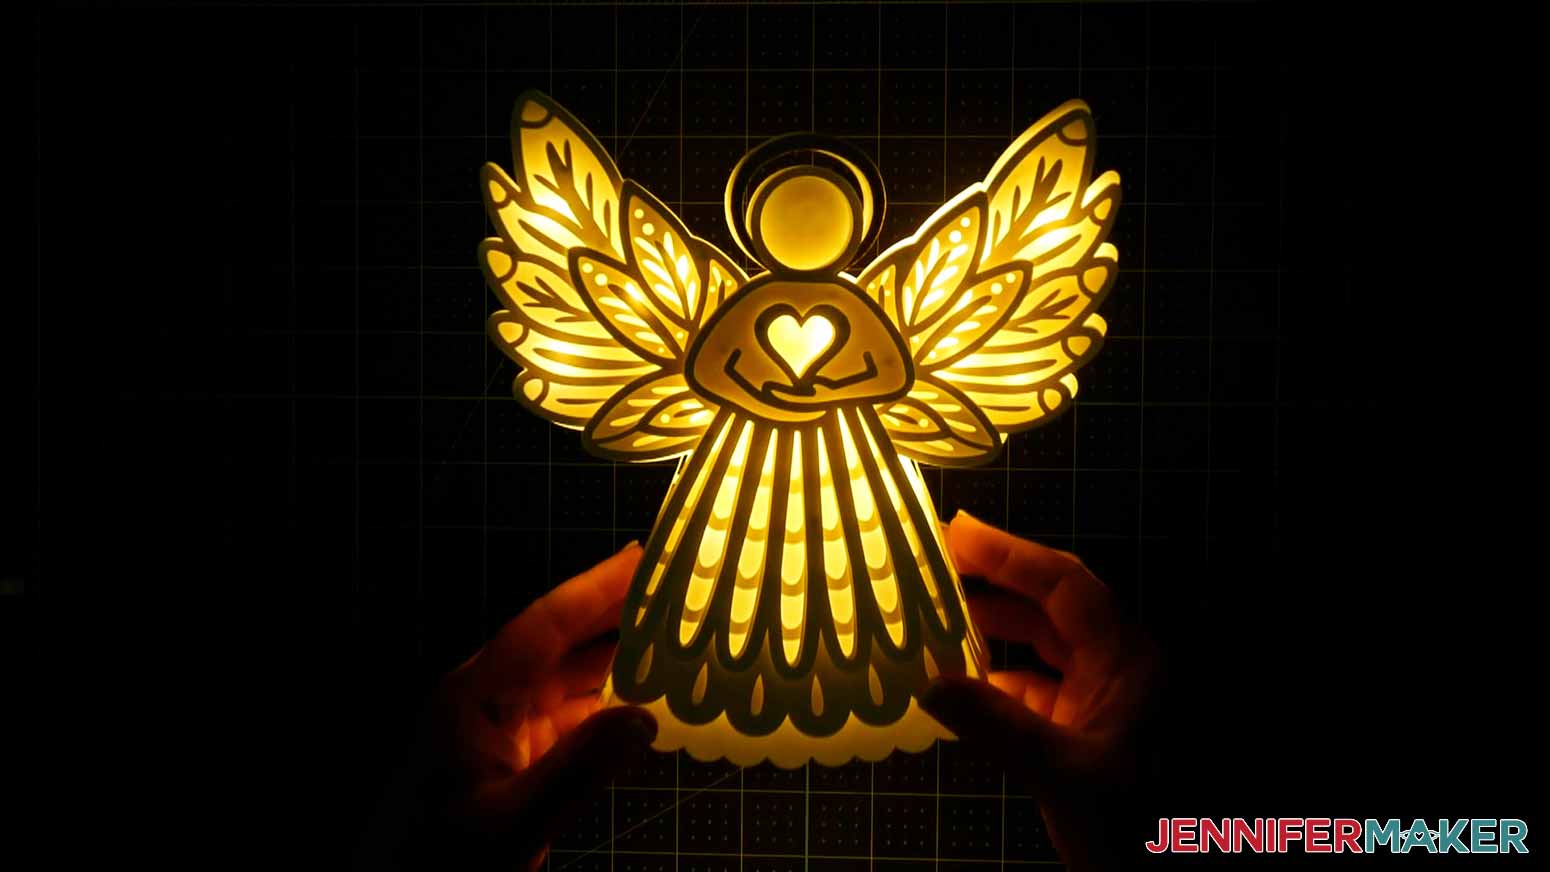
You're done! Turn on the lights and admire your finished angel.
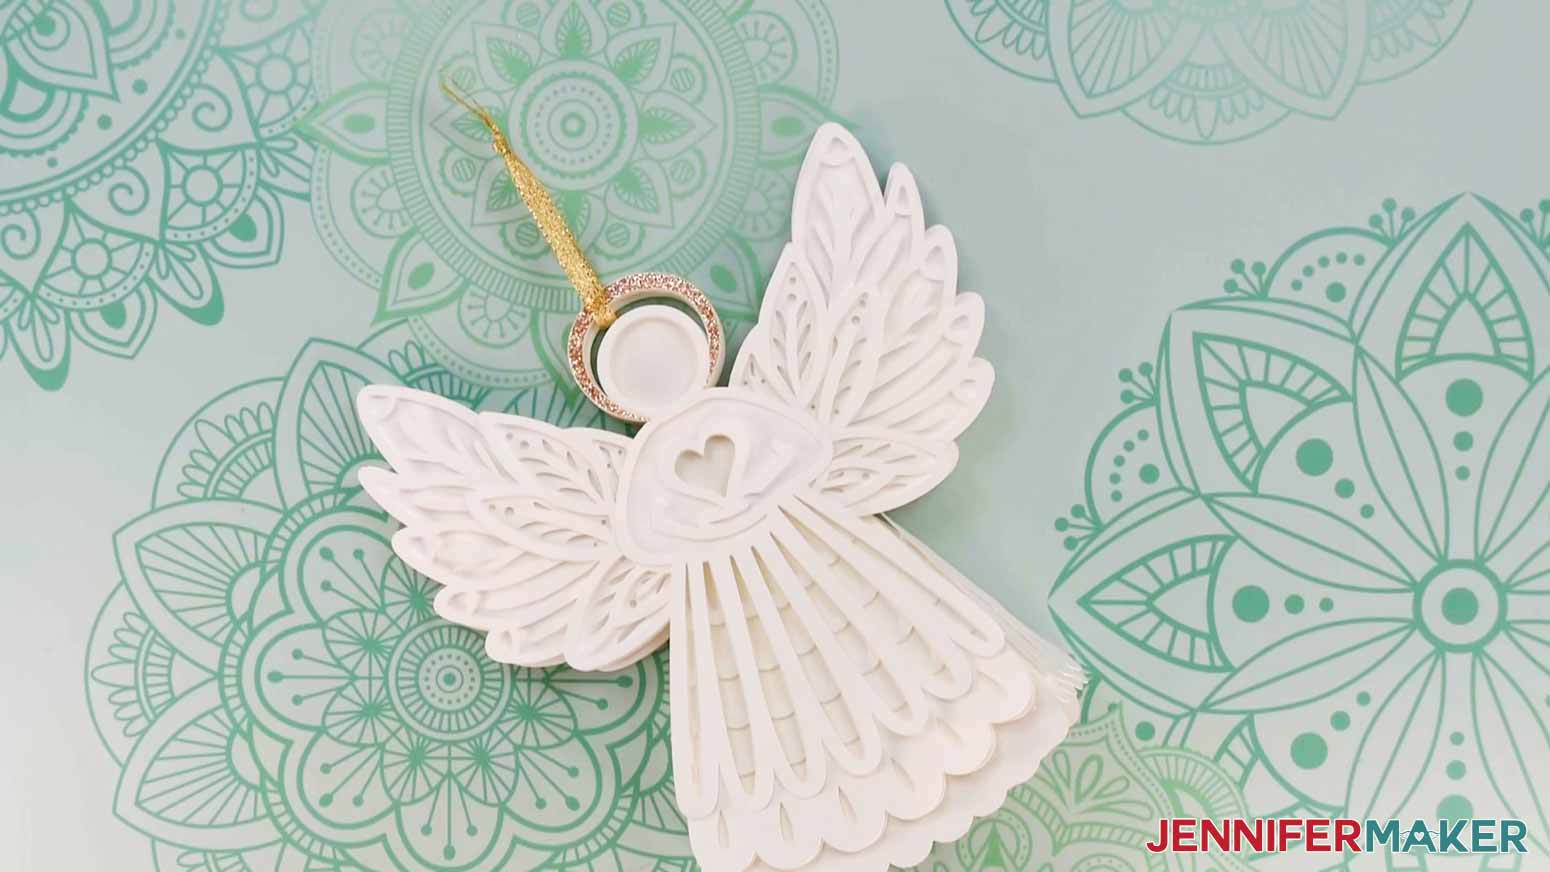
You can also make a small version like this one to use as an ornament!
Notes
Finished Size: 8" wide by 8.5" tall
My angel has a sister angel! If you’d like to make her, please visit my talented friend Gjoa’s website, Special Heart Studio. Gjoa shared her design as part of my 2020 Holiday Maker Fest and I’d love to see you make the pair!
The detailed step-by-step assembly video on how to the 3D light-up angel debuted during Maker Academy Weekend 2022, held online November 3-6, 2022. Get an on-demand pass to watch all 20+ workshops, each with a printable handbook, transcript, audio files, design files, and support with a VIP pass below:

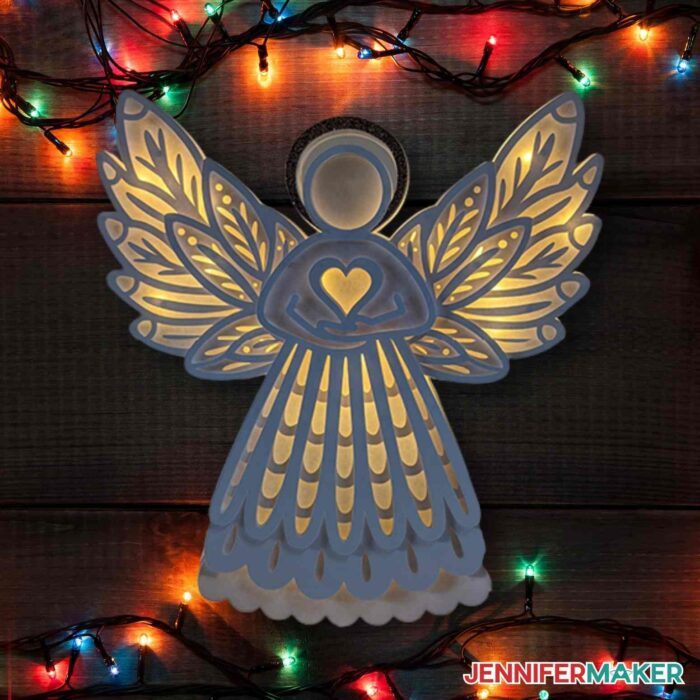
I really love this paper angel design. Here’s the ornament with the fairy lights inside. It gives off such a pretty glow, don’t you think?
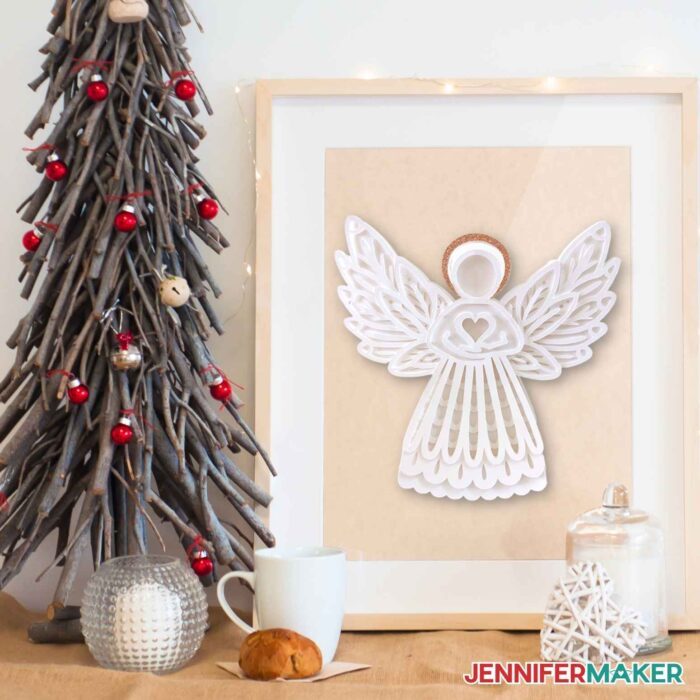
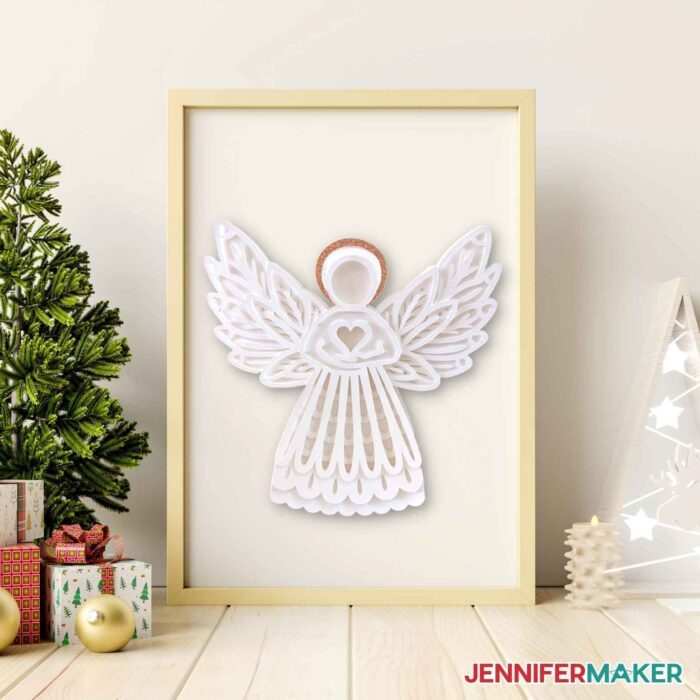
And here it is the angel beautifully displayed inside a picture frame. Your guests will be amazed that you’ve created this work of art and they’ll never know just how easy it was to make!
Answers to Your Questions About How to Make a Light Up Angel
Q: Where is your tutorial for this project?
This is a special project we made for our free Maker Academy Weekend 2022 event! A complete and detailed step-by-step video will premiered during the event November 3-6, 2022 — specifically, this tutorial video was available to watch for free for 24 hours beginning November 4 at 10:00 am ET! You can get access to the full video, the 15-page printable handbook that details how to make this beautiful project if you get a VIP Pass to Maker Academy Weekend 2022, which comes with other perks and bonuses, too! Look at all the paper angels made by our VIP passholders in the lead up to our big event!
Q: What blade do you need to make intricate cuts on cardstock on Cricut?
If you’re planning to use your Cricut to cut cardstock, you’ll need to make sure you have the right blade. All modern Cricut cutting machines come with a Fine-Point blade that is ideal for cutting intricate designs in paper, cardstock, and other thin materials. However, if you’re cutting really heavy cardstock (like over 100 lb.), you may need to use a Deep-Cut Blade. The deep-cut blade is stronger and sharper, making it ideal for cutting through thicker materials up to 1.5mm thick. You can purchase Deep-Cut blades separately or as part of a blade kit.
Q: What kind of lights do you use in layered cardstock projects?
One option is LED fairy lights. These small, delicate lights add a touch of whimsy to any project. You can tuck them behind layers of paper to create a softly glowing effect. Another option is LED strip lights. These are slightly larger than fairy lights, but they pack a powerful punch of light and weigh more. We think lightweight fairy lights work the best.
Q; How do you cut your cardstock so intricately without tearing and ripping?
A: The key is to use a clean sticky machine mat and a clean fine point blade. Learn more about getting cleaner cuts on your Cricut cardstock projects in my Cricut Cutting Problems guide.
Q: Is there another layered paper angel like this I can make?
Yes! Check out my friend Gjoa’s Layered Christmas Angel, which is the older sister to our angel — she pioneered this particular style of angel, which inspired our own design. Get her lovely angel over at SpecialHeartStudio. While you’re there, check out Gjoa’s other AMAZING designs — she is very talented!
Get my free SVG files to create this stunning paper angel!
I SO hope you’ll make one or both angels! Please share a photo of your 3D light-up angels in our Facebook group or tag me on social media with #jennifermaker.
Love,

Want to remember this? Save this 3D Light Up Angel Tutorial to your favorite Pinterest Board!


Thank you so much
Both of those angels are amazing, such beautiful work, keep it up
So happy to hear you like this project, Helen!